Starting to work with Git and GitHub can be pretty confusing as a beginner. Therefore, I made this guide to explain the basics of Git and GitHub, using a few extremely scientific analogies…
What are they?
Stupid.
Just kidding.
The goal of Git is to keep track of changes to your code. Think of it like saving a game.
- Get cool gear
- Fight some monster
- Die and lose all your cool gear
That’s the reason why I’ve lost a few keyboards… If you were smart, you would have saved your game before starting the fight. Let’s try it again:
- Get cool gear
- SAVE THE GAME (save 1)
- Fight some monster
- Die and lose all your cool gear
- Load SAVE 1!
Now you’ve lost nothing and can perhaps gather even more powerful gear before trying again. The same idea applies to code too.
- Write some cool code
- Works!
- Write even more cool code
- Doesn’t work!
Again, a valid reason to smash another keyboard. But what if we had saved the working version?
- Write some cool code
- Works!
- SAVE THE CODE (save 1)
- Write more cool code
- Doesn’t work!
- Go back to save 1
Programmers call this idea version control. The saved code with all the changes, a repository.
The saves are versions (save 1, 2, 3…) where you can revert back to. Of course, there needs to be some System that Controls these Versions. Hence, the name Version Control System (VCS).
In a game, this is the game itself. In programming, this is usualy Git.
Git vs. GitHub
I bet all my money (4.45 €) on Git!
I’m going to stop with my dry jokes…
Git is local, so your multi-billion dollar SaaS’s progress stays on your computer. This is useful, until your computers decides to die. Bye-bye dream…
To avoid this problem, you’ll need to make a back-up of your repository. You could use an USB stick like your grandpa or… store it in the cloud. There are many organizations that offer this service of which GitHub is the most popular.
Github adds more to Git than version control. Online collaboration!
Prerequisites
You’ll need to install Git first.
During installation, make sure Git is added to your system’s PATH if the installer asks about it. This allows you to run commands such as git from your terminal. Afterwards, restart your computer so the changes take effect (and be not like me wondering why it doesn’t work…).
If you’d like to follow this tutorial, I highly recommend downloading Visual Studio Code (VS Code) too.
Git Flow
We’ll start locally, on your computer. Imagine you’re about to write your multi-billion-dollar SaaS. You create a folder, open it in VS Code and open the terminal.
Creating a repository
The first thing you need to do is tell Git that this folder should become a Git repository:
git init
This wakes Git up, just like your alarm clock before an exam.
Git now creates a sneaky .git directory inside your project. This directory contains the information Git needs to keep track of your repository and its history. DO NOT DELETE IT TO SAVE SPACE! (I’m definitely not speaking from experience)
Your project is now a repository, or repo for the cool devs.
Staging
Now let’s say you’ve created a professionally named file called stuff.js.
You can ask Git to put that file into the staging area:
git add stuff.jsOr, if you want to stage all appropriate changes in the current directory:
git add .I always got really confused here. git add does not mean “save this file.” Instead, Git is looking for files that need to be saved in the future.
This intermediate area is called the staging area (or sometimes the index) by developpers.
Imagine an empty stage. That is the situation before ‘staging’. When you add props to it, you are setting up a scene. The same applies to code: initially, no files are being monitored for changes. You then add files to the ‘staging’ area using git add.
Tip: Use git status to see which files are added to the index or untracked. Or look into VS Code.
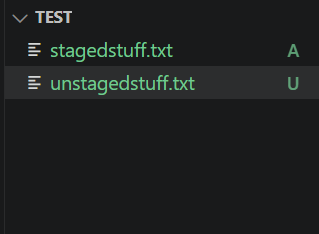
What is the benefit of this? When we ‘stage’ our scene, we take a snapshot of it. That snapshot allows you to look back at how the scene looked previously. We want exactly the same thing for our files: a captured moment we can always return to if we mess things up. Developers who take such a ‘snapshot’ of their code call this ‘committing‘.
Committing
We take the photograph with:
git commit -m "Added stuff"
It’s recommended to add a message so you know what the photo meant. This is really useful if you have dozens of photos of scenes lying around. I used to not follow this practice with very great workflows later…
You can see your commit history with git log.
So our basic workflow is:
git add .
git commit -m "Describe what changed"
And then we can continue writing code.
Accidentally staged feet pics (happens to the best of us)
Suppose you ran:
git add .and realized that you didn’t actually want to stage everything.
You can remove files from the staging area with:
git restore --staged feetfront1.pngThe file isn’t deleted (luckily). Its changes are simply no longer staged for the next commit.
Commited bad code to the nuclear reactor (oopsie)
Oh no… What do I do now? Euhh… Aha, blame it on the intern! But… my information is attached to the commit! There has to be a better way!
git reset [commitHash]allows you to go back to a previous save. The made commit is still there though…
If you’d like to keep your file changes, use
git reset --soft HEAD^(HEAD^ means “go back one commit”, it’s the same as HEAD~1)
If you really want no one to see your bad code, use:
git reset --hard HEAD^In short:
| Flag | History moved? | Staging reset? | Working Directory changed? | File changes preserved? |
--soft | Yes | No (staged) | No | Yes (Ready to re-commit) |
(default / --mixed) | Yes | Yes (unstaged) | No | Yes (Unstaged in your editor) |
--hard | Yes | Yes (unstaged) | Yes (destroyed) | NO (Changes wiped completely) |
When Git is too enthusiastic
Sometimes, you don’t want files full of passwords, API keys or feet pictures, in your repository . Luckily, we can temper his emotions with the .gitignore file.
The syntax of the file is as following
directory/
.name
*Name (* is a wildcard, so fName, FiName, ABCDName would all be left out)
One important detail: .gitignore doesn’t make a file magically invisible to Git.
It mainly tells Git which untracked files it should not automatically consider for staging.
For example, if you already committed/staged a .env file containing an API key, adding .env to .gitignore doesn’t remove it from your Git history! Once again, certainly not learned from experience…
And if you’ve accidentally committed a real secret, simply deleting the file in a later commit may not be enough—the secret can still exist in previous commits. In that situation, you should revoke/rotate the secret and, when necessary, clean it from the repository’s history. Never happened to me… Who falls for this!
Tip: In VS Code, you can install an extension that automatically gives you a starting template for a certain programming language.
Branching out
Now we get to one of the most mental health endangering concepts of Git: branches.
I hope you’re not too hungry, because I’ll use cooking as the analogy.
Let’s say you have a recipe for a delicious pudding.
- You make
- Tastes njam njam
You know the recipe works, so you publish it online for everyone to use.
Then you get an idea: “What if I put a cherry on top?”
You don’t want to immediately change the published recipe. What if you mess it up and can’t remember the original one? That means you and the other pudding enthusiasts suddenly have oddly looking puddings. I can assure you, nuclear weapons will be launched at you.
To avoid this, you create a separate version of your work and experiment with it. Nobody knows about this recipe as it isn’t published, so others still read the old recipe that’s guaranteed to work.
You now have:
main
└── The original pudding recipe everyone loves

feature/cherry
└── The experiment
You can modify the feature branch without changing the main branch!
But here’s an important correction to the analogy…
A Git branch isn’t literally a copy of all your files. A branch is essentially a movable pointer to a commit. That sounds like headache time, but the idea becomes clearer when you visualize the history.
Imagine your repository has these commits:
A --- B --- C
            ↑
          main
main points to commit C.
Now you create a branch:
A --- B --- C
            ↑↑
         main feature
Both branches currently point to the same commit.
Then you make a change and commit it on feature:
A --- B --- C --- D
            ↑     ↑
          main feature
Now the branches have diverged.
main still points to C.
feature points to D.
This is why changes made on feature don’t automatically appear on the public main!
In the terminal (like the real ones)
You can create and switch to a new branch with:
git switch -c feature/cherryThe -c means “create.” Without switching, you could use:
git branch feature/cherryYou can see your branches with:
git branchAnd switch to an existing branch with:
git switch mainWorking on the Branch
Go to:
feature/cherryWe can modify our pudding recipe—or, more realistically, our code.
For example:
git add .
git commit -m "Add cherry topping"
Our history now looks something like:
A --- B --- C --- D
            ↑     ↑
          main feature/cherry
The main branch hasn’t changed.
That’s useful because the code on main can remain stable while we experiment with our pudding.
If the feature turns out to be terrible, we can simply abandon the branch without being targetted by pudding enthousiasts.
If it turns out to be fantastic, we could publish it. But, how? Throwing away the old recipe is an option, but we prefer to simply add the new steps from the new recipe to the old one. This is merging.
Merging
We want the changes from feature/cherry to become part of main.
First, we switch to main:
git switch mainThen we merge the feature branch:
git merge feature/cherryGit now incorporates the changes from the feature branch into main.
After a successful merge, you might have:
A --- B --- C --- D
                  ↑
                 main
The exact history can look different depending on how the branches diverged and how the merge was performed, but the important part is that the changes from the feature branch are now incorporated into main.
Once we’re finished with the branch, we can delete it:
git branch -d feature/cherryDeleting the branch does not necessarily delete the commits that were merged. The commits remain part of the repository’s history.
Merge Conflicts (ooh drama!)
Let’s say both you and another pudding enthousiast changed the recipe at the same time. The first one is sweeter, the other one has a nicer color. There could only be one recipe.
Sooo, who wins?
That’s a merge conflict and it needs to be resolved.
Git marks the conflicting area in the file (e.g difference in sugar), and you decide which version—or combination of versions—you actually want.
After fixing the conflict, you stage the resolved file and commit the result:
git add filename
git commit
When dealing with merge conflicts, it might feel like you have to fight like a gladiator against lions harboring inferior ideas for the same project, but they are a normal part of collaborative development.
Commands
Here’s a quick overview:
| Command | Explanation |
|---|---|
git branch | Shows all the branches |
git switch -c branchName | Create a branch (old documentation uses git checkout -b branchName) |
git switch branch-name | Switch from branch |
git merge branchName | Merge the branch with the main |
| Delete the branch |
git status | Shows the current state of your working tree |
git log | Shows commit history |
Github slides in
So far, everything has happened locally on your computer. Time to change that!
GitHub can host your Git repository online, which gives you a remote copy and makes collaboration much easier.
Go to GitHub, create an account if you don’t already have one, and create a new repository.
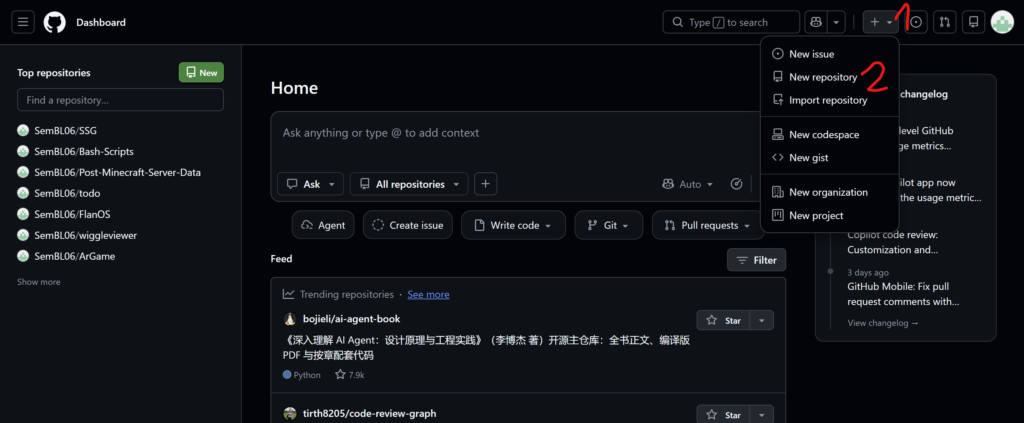
On GitHub, you’ll be able to browse the files, commits, branches, issues, pull requests, and other information associated with the repository.
If you already have a local Git repository, GitHub gives you commands for connecting the two.
For example:
git remote add origin https://github.com/your-name/your-repository.git
git branch -M main
git push -u origin main
Let’s break that down.
git remote add origin
This tells your local Git repository about a remote repository.
origin is simply the conventional name we give that remote. You could technically call it something else like “pudding”, or “stuff”.
git branch -M main
This renames the current branch to main.
git push
This sends your local commits to the remote repository on GitHub.
Collaboration
Now that your billion-dollar SaaS is safely stored on GitHub, obviously you want other people to work on it. There are two common situations:
You have permission to modify the repository
If you own the repository, or you’re a collaborator with permission to push to it, a typical workflow looks something like this:
- Clone the repository if you don’t already have it locally:
git clone <repository-url> - Enter the repository:
cd your-repository - Create a feature branch:
git switch -c feature/my-awesome-feature - Make your changes.
- Stage and commit them:
git add .git commit -m "Add my awesome feature" - Push your branch to GitHub:
git push -u origin feature/my-awesome-feature - Create a Pull Request (PR) on GitHub.
- Other contributors can review the changes, leave comments, and request modifications.
- Once the project maintainers are happy with the changes, the pull request can be merged into
main. - Finally, update your local
mainbranch:git switch main
git pull
And repeat.
What Is a Pull Request?
Despite the name, a Pull Request isn’t a Git command. It’s a GitHub feature!
When you create a pull request, you’re essentially saying:
“I’ve made these changes on my branch. Could someone review them and, if they’re happy, merge them into the project’s branch?”
This is one of the reasons GitHub is useful for teams: you don’t have to blindly throw everyone’s changes into the main codebase.
What If You Don’t Own the Repo?
This is especially common with open-source projects like ArnoldC. That’s where forks come in.
On GitHub, you can click Fork.
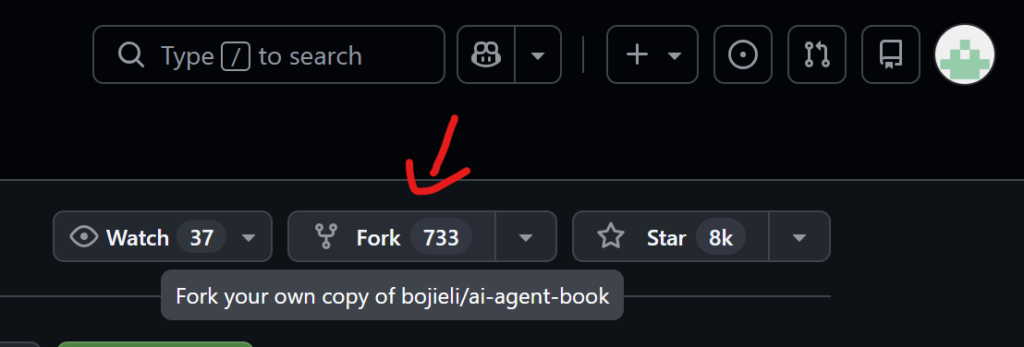
A fork creates your own GitHub repository based on the original repository. You have control over your fork, but you don’t suddenly become the owner of the original project.
The workflow then looks roughly like this:
Original repository
        │
        │ fork
        ↓
Your GitHub repository
        │
        │ clone
        ↓
Your computer
You clone your fork:
git clone <your-fork-url>Then create a branch:
git switch -c feature/my-featureMake your changes:
git add .
git commit -m "Add my feature"
Push the branch to your fork:
git push -u origin feature/my-featureFinally, you open a Pull Request from your fork to the original project’s repository.
The project maintainers can then review your contribution.
If they like it, they can merge it into their project.
From experience…
Git and Github are difficult, but incredibly useful. It took me quite a while to understand these concepts and apply them correctly. This will probably apply to you too. So be patient! And… try not to smash your keyboard…
Leave a Reply